Building a Modern Web App with Django, Vite & shadcn/ui (Part 1) – Project Setup
- Taufiq Ibrahim
- Web development
- March 22, 2025
Table of Contents
This is the first article in a series on building a modern web application using the following technologies:
- Frontend service built using React + Vite
- UI components using shadcn/ui
- Backend service using Django
The final code of this article available as a branch on https://github.com/tibrahimdev/web-app-django-vite-shadcn/tree/1-initial
The Goals
- Frontend only (no backend involved yet)
- A single page on
/dashboardpath showing a colapsible sidebar - Other path will return 404 page
- Create great UI with the help of
shadcn/uicomponents
Initialize the UI
We will start by scaffolding a new Vite project – following Scaffolding Your First Vite Project.
We will use node 22 and pnpm through the entire project
pnpm create vite frontend --template react-ts .
It will print output like this:
│
◇  Scaffolding project in /home/user/web-app-django-vite-shadcn/frontend...
│
└  Done. Now run:

  cd frontend
  pnpm install
  pnpm run dev
As mentioned above, let’s move to frontend directory and run that two commands.
  VITE v6.2.2  ready in 183 ms

  ➜  Local:   http://localhost:5173/
  ➜  Network: use --host to expose
  ➜  press h + enter to show help
We will have the UI accessible on http://localhost:5173.
Let’s do few things here:
- Delete
frontend/src/App.css - Delete
frontend/src/App.tsx - Edit the
frontend/src/main.tsxinto an empty page.
Previously, it should looks like this:
import { StrictMode } from 'react'
import { createRoot } from 'react-dom/client'
import './index.css'
import App from './App.tsx'

createRoot(document.getElementById('root')!).render(
  <StrictMode>
    <App />
  </StrictMode>,
)
Now, let’s change it into this:
import { StrictMode } from 'react'
import { createRoot } from 'react-dom/client'
import './index.css'

createRoot(document.getElementById('root')!).render(
  <StrictMode>
  </StrictMode>,
)
Short explanation:
- Above code creates a basic React app and displays a webpage.
- It imports React, ReactDOM, and a CSS file for styling.
createRoot(document.getElementById('root')!)finds the<div id="root">inindex.html.StrictModehelps catch common mistakes in development..render(...)puts whatever content inside it.
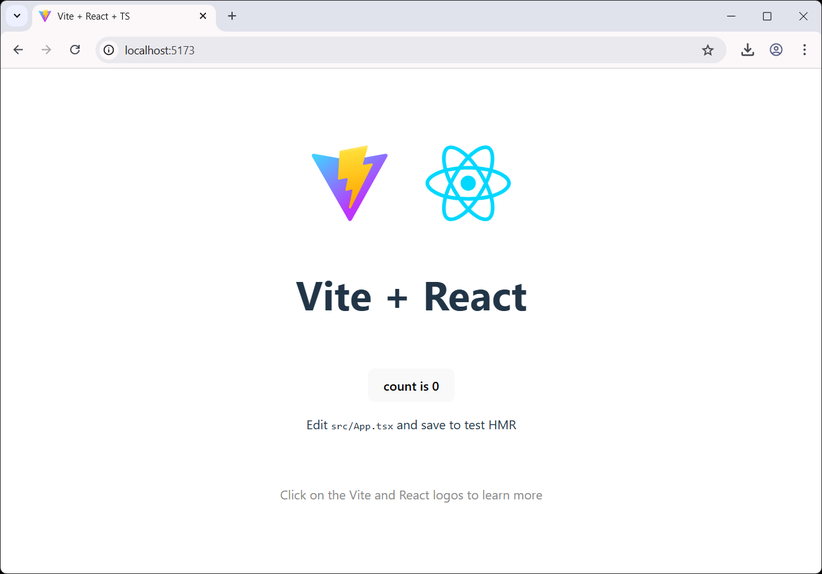
The UI will become as simple as this empty page:
Setting Up Routing
Back to our goals, we wanted to have a /dashboard path to be rendered and other URLs to be served using 404 not found page. That goals requires a mechanism called routing. This is very basic, somewhat forgotten, but we will do this as early as possible on our project.
To do that, we will use a popular library called React Router, which state itself as A user‑obsessed, standards‑focused, multi‑strategy router you can deploy anywhere.
There are 3 modes of routing available on React Router. To help developer decide which mode should be taken, React Router has a great documentation on Picking a Mode.
On this project, we will use the Data mode, since it’s allow us to build a more customized and more controls.
React Router Installation
pnpm add react-router
Creating the Router
Start by creating an empty file on frontend/src/router.tsx. Populate it with following content:
// frontend/src/router.tsx
import { createBrowserRouter } from "react-router";

export const router = createBrowserRouter([
  {
    path: "/",
  }
]);
As stated in the documentation, we will use createBrowserRouter which takes an array of route objects that support loaders, actions, error boundaries and more. For now, we have the root path "/" with nothing else.
Let’s render the router by adding <RouterProvider> in the frontend/src/main.tsx:
// frontend/src/main.tsx
import { StrictMode } from 'react'
import { createRoot } from 'react-dom/client'
import './index.css'
import { RouterProvider } from 'react-router'
import { router } from './router'

createRoot(document.getElementById('root')!).render(
  <StrictMode>
    <RouterProvider router={router} />
  </StrictMode>,
)
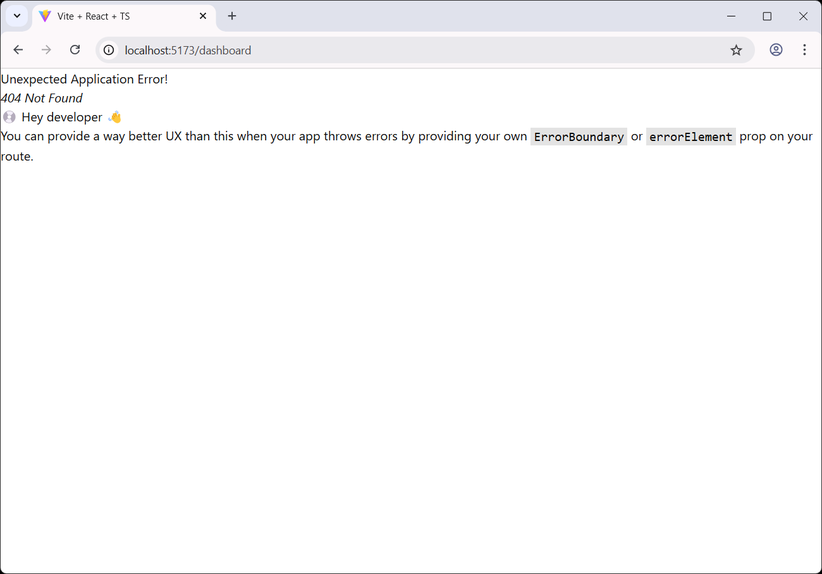
Now, if we save it and try to navigate to http://localhost:5173, the same empty page will be rendered. But, if we try to navigate to http://localhost:5173/dashboard, it will show an error page saying Unexpected Application Error! 404 Not Found and tells use to provide ErrorBoundary or errorElement. We’ll get back to that later. For now, let’s focus on how to show /dashboard first.
Routing to /dashboard
This section shows on how render a correct page for /dashboard and get rid of the 404 not found page.
Let’s start by adding a child on our router:
import { createBrowserRouter } from "react-router";

export const router = createBrowserRouter([
  {
    path: "/",
    children: [
      {
        path: "dashboard",
      }
    ]
  }
]);
We have added a child, which consist of an array of single object, with a path equal to dashboard.
Now, if we go back to our browser, it will show an empty page instead of a 404!
Try to put something else like http://localhost:5173/users and you will get the same 404. But that’s expected. At this point, we have our router working 🎉.
Next, we will working on the user interface 🚀.
Working on the User Interface
Install shadcn/ui
Let’s continue by installing shadcn/ui. This is a beautiful UI component framework which let us to be more productive on building user interface.
shadcn/ui provides a lot of option to install on https://ui.shadcn.com/docs/installation. As we are using vite, we will just follow the instruction on https://ui.shadcn.com/docs/installation/vite.
As we already scaffold our Vite app, we can just continue with the next section on that documentation which is 2. Add Tailwind CSS.
pnpm add tailwindcss @tailwindcss/vite
The documentation says: Replace everything in src/index.css with the following:
// src/index.css
@import "tailwindcss";
Next, we move to 3. Edit tsconfig.json file. Based on shadcn/ui explanation, it says that the current version of Vite splits TypeScript configuration into three files, two of which need to be edited. Add the baseUrl and paths properties to the compilerOptions section of the tsconfig.json and tsconfig.app.json files:
// frontend/tsconfig.json
{
  "files": [],
  "references": [
    {
      "path": "./tsconfig.app.json"
    },
    {
      "path": "./tsconfig.node.json"
    }
  ],
  "compilerOptions": {
    "baseUrl": ".",
    "paths": {
      "@/*": ["./src/*"]
    }
  }
}
Add this into compilerOptions section of frontend/tsconfig.app.json:
// frontend/tsconfig.app.json
{
  "compilerOptions": {
    // ...
    "baseUrl": ".",
    "paths": {
      "@/*": [
        "./src/*"
      ]
    }
    // ...
  }
}
Next, on the 5. Update vite.config.ts. We need to install @types/node then edit vite.config.ts.
pnpm add -D @types/node
// frontend/vite.config.ts
import path from "path"
import tailwindcss from "@tailwindcss/vite"
import react from "@vitejs/plugin-react"
import { defineConfig } from "vite"

// https://vite.dev/config/
export default defineConfig({
  plugins: [react(), tailwindcss()],
  resolve: {
    alias: {
      "@": path.resolve(__dirname, "./src"),
    },
  },
})
Next, we will run the shadcn init command to setup our project:
pnpm dlx shadcn@latest init
✔ Preflight checks.
✔ Verifying framework. Found Vite.
✔ Validating Tailwind CSS config. Found v4.
✔ Validating import alias.
✔ Which color would you like to use as the base color? › Neutral
✔ Writing components.json.
✔ Checking registry.
✔ Updating src/index.css
✔ Installing dependencies.
✔ Created 1 file:
  - src/lib/utils.ts

Success! Project initialization completed.
You may now add components.
You see, the shadcn/ui understand that we’re using Vite as the framework. We choose Neutral as the color theme. Well you can try other themes as well.
Creating the Sidebar on the Dashboard Page
Let’s get back to one our goals: A single page on /dashboard path showing a colapsible sidebar.
We will leverage the shadcn/ui component called Sidebar.
First, let’s install the component. All shadcn/ui components can be easily installed with the same command pattern.
pnpm dlx shadcn@latest add sidebar
Above command will print out few stuff like these:
✔ Checking registry.
✔ Updating src/index.css
✔ Installing dependencies.
✔ Created 8 files:
  - src/components/ui/sidebar.tsx
  - src/components/ui/button.tsx
  - src/components/ui/separator.tsx
  - src/components/ui/sheet.tsx
  - src/components/ui/tooltip.tsx
  - src/components/ui/input.tsx
  - src/hooks/use-mobile.ts
  - src/components/ui/skeleton.tsx
The command automatically creating 8 components which are the dependencies of the sidebar component. You can check the documentation on each of the component on https://ui.shadcn.com/docs/components/.
One big thing is, the command also update the frontend/src/index.css!
In the past, creating sidebar can be a long job. We’ll see on this section how productive can we be using a wonderful UI framework such as shadcn/ui.
As written in Sidebar documentation, now we need to create a file called frontend/src/app/layout.tsx with following content:
// frontend/src/app/layout.tsx
import { SidebarProvider, SidebarTrigger } from "@/components/ui/sidebar"
import { AppSidebar } from "@/components/app-sidebar"

export default function Layout({ children }: { children: React.ReactNode }) {
  return (
    <SidebarProvider>
      <AppSidebar />
      <main>
        <SidebarTrigger />
        {children}
      </main>
    </SidebarProvider>
  )
}
As you can see, it’s importing another file frontend/src/components/app-sidebar.tsx, which not exist yet. So, let’s create it:
// frontend/src/components/app-sidebar.tsx
import {
  Sidebar,
  SidebarContent,
  SidebarFooter,
  SidebarGroup,
  SidebarHeader,
} from "@/components/ui/sidebar"

export function AppSidebar() {
  return (
    <Sidebar>
      <SidebarHeader />
      <SidebarContent>
        <SidebarGroup />
        <SidebarGroup />
      </SidebarContent>
      <SidebarFooter />
    </Sidebar>
  )
}
Now, you probably ask, why should we create those 2 files? And where’s our dashboard page?
Relax, now it’s the right time to go back to our long-awaited dashboard – with a few more things to do.
Remember our router? Last time, we defined a route to /dashboard and we get an empty page. Why? Because we haven’t define the component to render the dashboard. Let’s define then.
// frontend/src/router.tsx
import { createBrowserRouter } from "react-router";

export const router = createBrowserRouter([
  {
    path: "/",
    children: [
      {
        path: "dashboard",

        // +++ lazy loading component
        lazy: async () => ({
          Component: (await import("@/pages/dashboard")).default
        }),
      }
    ]
  }
]);
Now, the http://localhost:5173 will show you a scary-error-page saying Failed to resolve import “@/pages/dashboard” from “src/router.tsx”
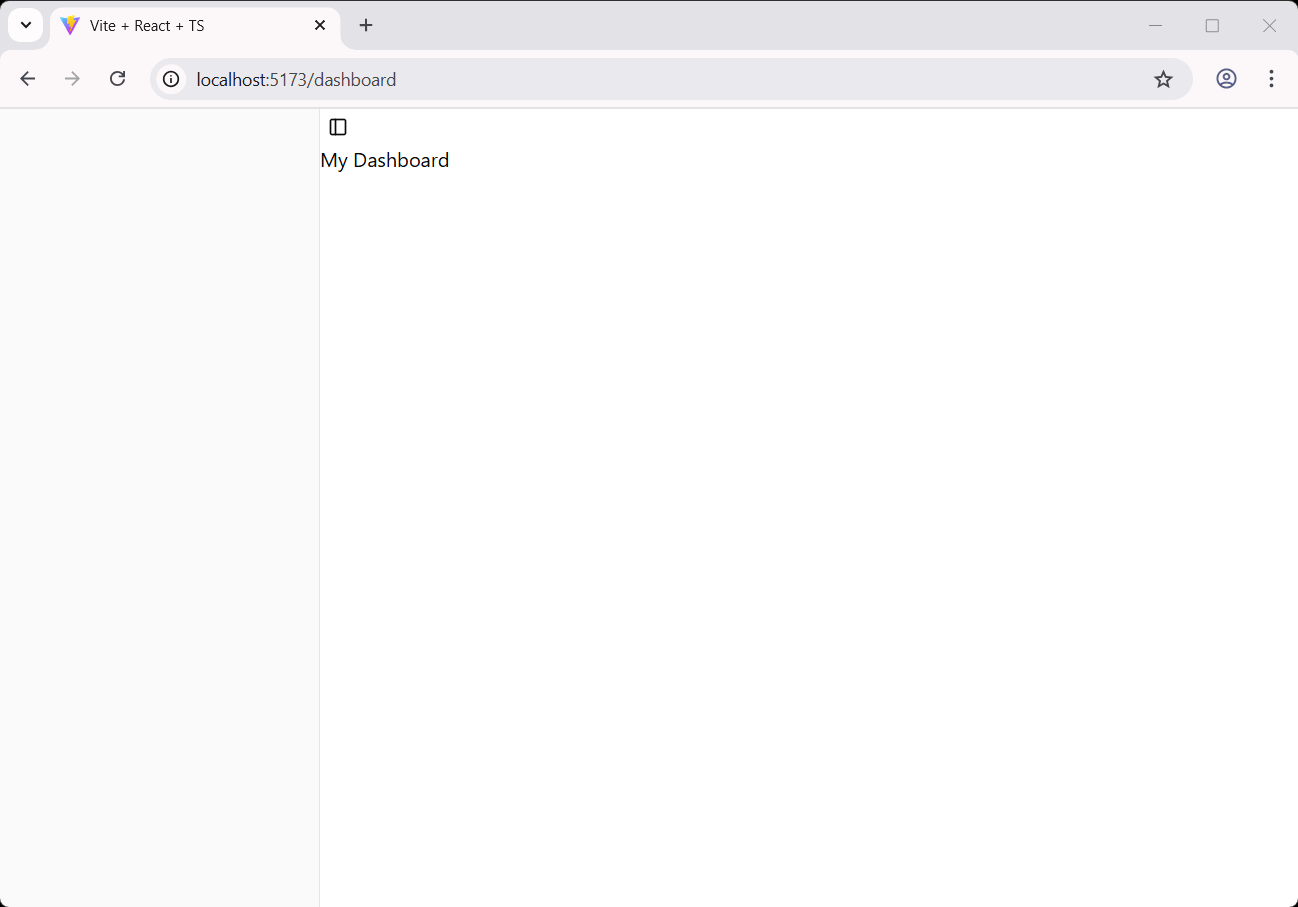
That is because we haven’t create frontend/src/pages/dashboard/index.tsx. Let’s create it with following content:
// frontend/src/pages/dashboard/index.tsx
import Layout from "@/app/layout";

export default function Page() {
  return (
    <Layout>
      <div>
        <h1>My Dashboard</h1>
      </div>
    </Layout>
  )
}
The simple rule is, the index.tsx must return an exported React component.
Now, let’s head back to our browser and see!
Populate the Sidebar Menu
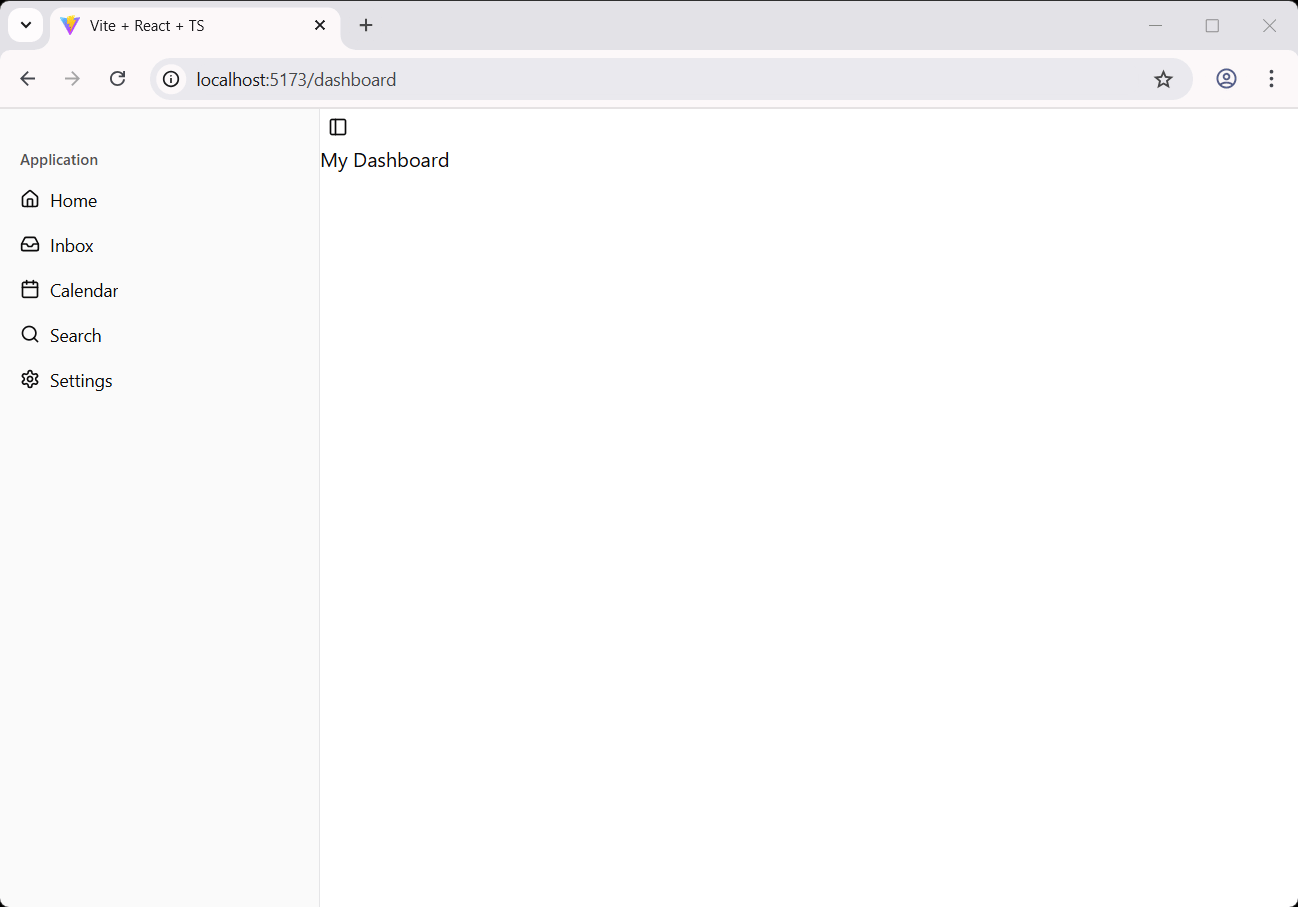
I believe you’ve stopped smiling now because you realized: There’s no menu on that sidebar.
Let’s add it then. Back to frontend/src/components/app-sidebar.tsx!
 1// frontend/src/components/app-sidebar.tsx
 2import {
 3  Sidebar,
 4  SidebarContent,
 5  SidebarFooter,
 6  SidebarGroup,
 7  SidebarGroupContent,
 8  SidebarGroupLabel,
 9  SidebarHeader,
10  SidebarMenu,
11  SidebarMenuButton,
12  SidebarMenuItem,
13} from "@/components/ui/sidebar"
14import { Calendar, Home, Inbox, Search, Settings } from "lucide-react"
15
16export function AppSidebar() {
17
18  const items = [
19    {
20      title: "Home",
21      url: "#",
22      icon: Home,
23    },
24    {
25      title: "Inbox",
26      url: "#",
27      icon: Inbox,
28    },
29    {
30      title: "Calendar",
31      url: "#",
32      icon: Calendar,
33    },
34    {
35      title: "Search",
36      url: "#",
37      icon: Search,
38    },
39    {
40      title: "Settings",
41      url: "#",
42      icon: Settings,
43
44    },
45  ]
46
47  return (
48    <Sidebar>
49      <SidebarHeader />
50      <SidebarContent>
51        <SidebarGroup>
52          <SidebarGroupLabel>Application</SidebarGroupLabel>
53          <SidebarGroupContent>
54            <SidebarMenu>
55              {items.map((item) => (
56                <SidebarMenuItem key={item.title}>
57                  <SidebarMenuButton asChild>
58                    <a href={item.url}>
59                      <item.icon />
60                      <span>{item.title}</span>
61                    </a>
62                  </SidebarMenuButton>
63                </SidebarMenuItem>
64              ))}
65            </SidebarMenu>
66          </SidebarGroupContent>
67        </SidebarGroup>
68      </SidebarContent>
69      <SidebarFooter />
70    </Sidebar>
71  )
72}
See what happen now!
Wrap Up
This wraps up the first article in our series on building a modern web application. So far, we’ve:
- ✅ Set up a frontend server.
- ✅ Built a /dashboard page with a collapsible sidebar using
shadcn/uicomponents. - ✅ Handled unknown routes with a 404 page.
In the next article, we’ll continue expanding our application by adding user authentication. Stay tuned and happy coding! 🚀